How To Prevent And Eliminate Spider Mite Infestations
Published :
Jul 25, 2017
Categories :
Other subjects

Spider mites are a particularly tricky pest to eliminate since they are great at becoming immune to insecticides and can destroy entire plants very quickly. We explore methods to avoid getting spider mite infestations, as well as a few home remedies to get rid of them if they ever attack your crop.
A usual suspect in a cannabis grow room, spider mites can be a tricky breed to rid yourself of, especially if you are growing in soil.
WHAT ARE SPIDER MITES?
Spider mites can infest a grow operation before they are even noticed by the naked eye! These tiny pests only measure around 0.4-0.5mm, forming tiny white, orange or yellow spots on plant leaves by piercing plant cells and sucking out their contents.
Spots are often mistaken for nutrient deficiencies and if left untreated, result in full infestations where whole leaves turn yellow and fine webbing begins to appear on the flowers.
Found on the back of cannabis leaves where they lay their eggs, spider mites have the potential to reproduce millions of times in the span of only one month. They rapidly become immune to whatever it is trying to kill them and if left unnoticed will multiply into "super-mites," two-spotted spider mites that are highly resistant to insecticides and are almost impossible to get rid of.
LIFE CYCLE OF THE SPIDER MITE
Spider mites have a life cycle that helps them re-populate quickly, after much of their population has been destroyed.
Adult females begin the cycle by laying eggs, often on their host plants. In the days or weeks that follow, an egg will hatch and become a larvae, which is the first stage of life. Larvae are round-bodied and have only three pairs of legs. The larvae feed for a few days, seek a sheltered spot to rest and then molt into the first nymphal stage. The first nymph now has four pairs of legs.
Spider mites have a life cycle of just a few days or weeks. Eggs laid by an adult female will turn into a larvae within several days, after which they will molt into the first nymphal stage with four pairs of legs. The first nymphs need a few more days in order to molt into the second nymph, where they move onto their adult stage.
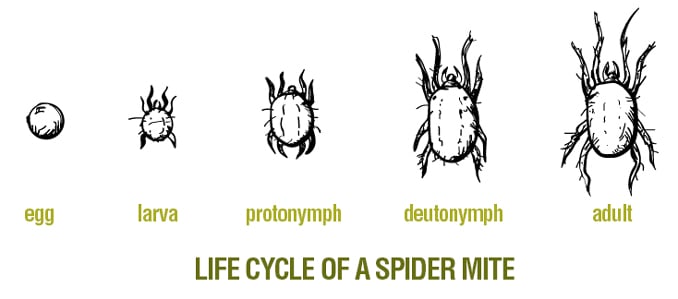
The first nymphs feed for a few days, rest and molt into the second nymph. The second nymphs feed, rest and molt into the adult stage. Overall, it can take days or weeks for spider mites to go through their entire life cycle. For this reason, it's easy to think you've gotten rid of a spider mite infestation when in actuality, they are in their immature stages of development.
IDENTIFYING AN INFESTATION
The problem is that these pesky mites love to gobble up entire plants in a very short period of time and cover everything in webbing. Spider mites are great at vanishing, only to return with a vengeance after a days or weeks. These mites are very tricky to get rid of, so it’s important to take action as soon as they are spotted.
The first step to ridding your crop of spider mites is to accept that you have an infestation. Indoor growers should be especially vigilant when checking their plants for pests and disease. Spider mites can appear as tiny black spots on plants at first, but when they attack, you should see light coloured speckles on the leaves. At this point, leaves may start to yellow, causing them to die prematurely.
Spider mites also have the potential to completely cover an entire foliage with fine silk, which quickly collects dirt and dust.
Always check both sides of your leaves at regular intervals. If you've already had a spider mite infestation, then you need to treat your grow area as though the spider mites are just in hiding, building up their numbers and planning to attack again.
There are different types of spider mites, but they can only be detected by the marks appearing on your plant, such as eggs, mites and yellow or bronze spots on the leaves and webbing.
HOW TO GET RID OF SPIDER MITES
Typical spider mites brought in from outdoors are generally quite easy to get rid of with some basic remedies. However, if you acquired your spider mites from clones or another plant, then you could be in for some rough times ahead. If you think this may be the case with your crop, take action now.
Some spider mites thrive on cannabis and as such, have become immune to the many home remedies used to deter pests. They are very quick to destroy plants and develop resistance to any new method you try.
It's better to cut your losses and start again. If you find yourself close to harvest, though, you may be able to squeeze by with some simple solutions to keep the pesky mites at bay until you can empty out your grow room and deep clean it.
STEP 1: KILL ALL SPIDER MITES
Spider mites detest a cool and windy environment, making it more difficult for them to reproduce. Try to take the temperature of your room down a bit and have a fan blowing over the plants. Ideally, you should spray off any spider mites you find on the plants and relocate them outdoors if you can.
• Control the heat.
• Have lots of air blowing over the plants.
• Spray spider mites off the plants if you can.
Good air circulation is good practice in your grow room since it prevents pests and encourages vigorous plant growth. Spider mites enjoy the heat and hate a windy environment. A cool, breezy grow space won't get rid of spider mites, but it makes it harder for them to reproduce. It also helps spray treatments dry faster on the plant.
Bleach solution: 1 tablespoon bleach to 1 gallon of 95°F pH balanced water in a mister or spray bottle. Clean and bleach all the surfaces in the grow room.
Alcohol and Water: 9 parts water to 1 part alcohol will kill spider mites on contact without harming the plant. You will need a mister to cover the leaves.
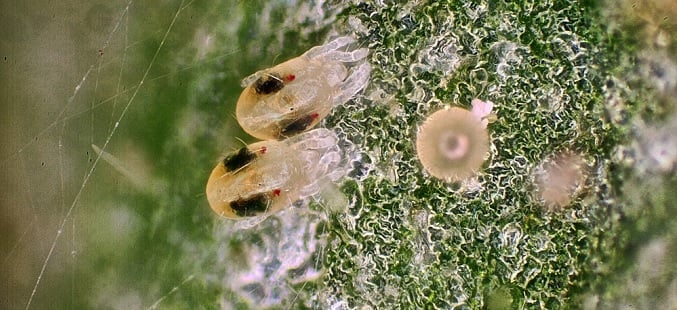
Insects: lady bugs and predatory mites can control and reduce populations of spider mites, although they cannot completely eradicate them. This is a good option if you're really close to harvest and you don't want to administer any chemicals.
Diatomaceous Earth: On a microscopic level, this fossil dust has the ability to tear and dehydrate the spider mites, slowing them down.
Some growers choose to treat the entire grow area with insecticides if the infestation is severe. This is usually only the case if you caught your mites from another grower and have the dreaded two-spotted-spider mites. These chemicals can end up in your final bud if you choose to use them and may be harmful for your health.
If you have a really bad infestation, then the best thing you can do is dismantle the grow room, completely clean and sterilise everything and start new with some fresh seeds. This will help you dodge the recurring problem of spider mites and keep you from ingesting chemical-laden weed.
Some common chemical spider mite killers are:
SM-90: 5 parts water to 1 part SM-90 is an organic and clean-smelling solution to kill spider mites. You will need a mister to cover the leaves.
Neem Oil: Works extremely well at eradicating bugs, although it smells fairly unpleasant and may be harmful to humans. Use with a mister.
Avoid chemical sprays which contain abamectin or lindane as they can be harmful to human health. Always follow the instructions on all chemical treatments and check the warnings.
STEP 2: FOLLOW UP WITH A DIFFERENT METHOD TO KILL THEM
At this point, the adults will be more resistant to your first method of killing them, so using a different technique should keep them suppressed.
STEP 3: REPEAT STEP 1 AND STEP 2 AT LEAST ONCE
Even after you think they are gone, spider mites can easily make a fresh appearance - more resistant than ever. Using around a dozen varied techniques to eliminate your spider mites should do the job, but beware that if you see one spider mite, there are probably thousands or millions more waiting to hatch.
PREVENTION
Ultimately, spider mites can be devastating for plants and you should always try to avoid getting them, certainly if you know other growers or have pets around. Here are some effective methods for preventing spider mites:
• Always make plans for cleaning and securing your grow room as this is the best way to avoid spider mites. Sterilise everything in between grows to avoid getting any harmful pests or animals close to your plants.
• Quarantine and treat all plants and clones from another location. Be sure to keep them away from your other plants until you know they are clean.
• Use a microscope to check for tiny spots on the leaves for eggs and bugs throughout every stage of the plant’s growth.
• Avoid stepping into your grow room so that you don't bring in any bugs. This is especially relevant if you have visited other grow rooms.
KEEP BENEFICIAL INSECTS
• Only use pesticides if it is absolutely necessary. These will kill off all insects, even those beneficial to the plant.
• Only focus on the bugs you are trying to get rid of.
• Predatory insects including ladybugs, their babies and the "Western Predatory Mite" act as helpful defenses for your crop.